Search

Entries in holiday recipes (29)

Monday
Apr142014

HOW TO COOK THE PERFECT HARD-BOILED EGG FOR DEVILED EGGS

HOW TO MAKE THE BEST HARD-BOILED EGG FOR DEVILED EGGS AND HOW TO COOK THEM SO THEY PEEL EASILY: TIPS FROM FOOD NETWORK, ALTON BROWN, JACQUES PEPIN AND MORE...

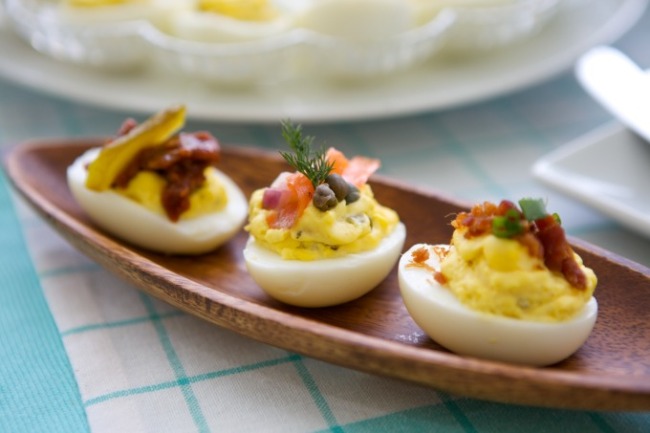
Easter is the unofficial kick-off of deviled egg season because after Easter come picnics, outings at the lake and all of those backyard BBQ’s where deviled eggs always make an appearance on the menu. Here’s my question… are all hard-boiled eggs created equal?  

I’ve seen lots of posts on social media in the past days discussing how to make a perfect hard-boiled egg. None of them are the same. Most are similar but they all have their own twist or timing.

I’ve been cooking hard-boiled eggs the same way for so many years and always thought my way was the only way. Today, I decided to do a hard-boiled egg study from some of the more prominent offerings on the Internet to see which hard-boiled egg is the best egg for those yummy deviled eggs we cannot wait to eat on Easter Sunday.

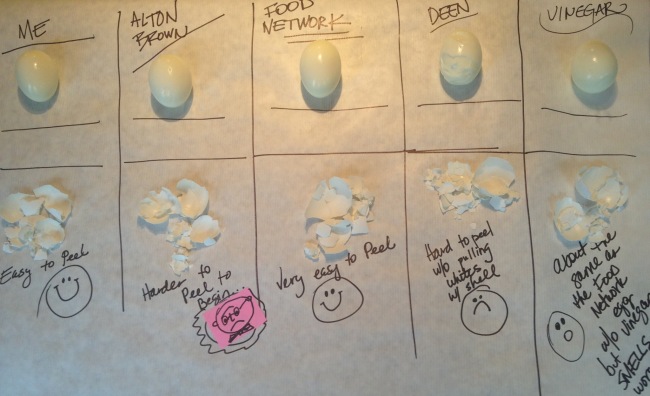
I compared hard-boiled egg cooking instructions from Julia Child, Alton Brown, Food Network, the Deen family, and the old school method of adding vinegar to the water to my own tried and true hard-boiled egg method. I also watched videos from Jacques Pepin and Food & Wine. The test was based on three criteria: texture of white, texture of yolk and ease of peeling. DISCLAIMER: This was not a blind taste test as I was the only person in the kitchen.

HERE'S WHAT I FOUND OUT: TIPS FOR COOKING THE PERFECT HARD-BOILED EGG

  • Farm eggs are harder to peel after boiling. Save your farm eggs for baking or ice cream. Fresh eggs from the store have thinner membranes which do peel easier so hard-boil super fresh eggs.
  • Do not cram too many eggs into a pot. You want to cover the eggs with one inch of water and leave room in the pot so you can stir the eggs around as they cook.
  • Stirring the eggs occasionally during the cooking process helps yolks stay centered and the whites have two sides which are equally thick; better for stuffing and not lopsided.
  • Use room temperature eggs and water or cold water and cold eggs. The result is about the same but eggs will crack more often if you add cold eggs to hot water.
  • You can peel the eggs easier if you run them under cool water or put them in an ice bath for 2-3 minutes only. Alton suggests 5 minutes in the ice bath but those were slightly harder to peel. I prefer to quickly rinse in cool water just until you can handle them. Crack and put back in the water; peel quickly by popping the large end with the air pocket on the counter-it seems to make the peel come off in larger pieces.
  • Some people suggest rolling the egg on the counter using the palm of your hand to crack the peel but I found all of those little pieces harder to peel. I used to do this but now prefer the "pop the air pocket" method.
  • Adding salt, vinegar or baking soda in the water does not make the peeling process easier and when you boil the eggs with vinegar, the whole house stinks.
  • The egg whites will become tough and rubbery if you cook more than the recommended time- you will not want to eat rubbery eggs ever again once you’ve had a properly cooked egg.
  • The ucky green ring around the outside is truly caused by overcooking and no other reason. The longer you cook the egg, the darker that outer ring becomes. Watch the Jacques Pepin video- he talks about this.
  • A soft or medium boiled egg yolk does not work as well for deviled eggs. The yolk was a little gummy when mixed with mayonnaise, etc. for the filling. However, the medium boiled egg (Alton Brown’s egg) was very delicious with just salt and pepper.

THE RESULTS

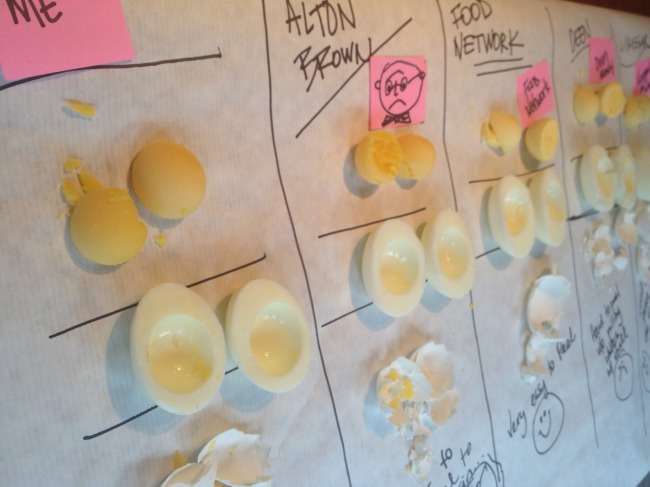
The Food Network method for hard-boiled eggs seemed to work the best because they peeled easier and had a better texture than the other versions but only slightly better than my own method. The instructions did not say how long to keep the egg in the ice bath so I left it in for 2 minutes. Follow the cooking instructions for the hard-boiled egg if you want to make deviled eggs. Here's the link...

My own cooking method worked just fine… tried and true. It was the runner-up to the Food Network method, but only because their method did peel slightly easier. Here's what I do:

Start with cold eggs; add cold water to the pot, covering eggs by one inch. Stirring the water occasionally, bring the water to a boil. Reduce the heat to low. Boil on low for one minute. Remove from the heat and let the eggs stand for 14 minutes, stirring from time to time. Immediately rinse in cold water until the eggs are just cool enough to handle. Pop each one- the larger side where the air pocket is- on the counter and put back in the water, working quickly to peel the eggs while they are still warm. Here's my deviled egg recipe. You'll love it.

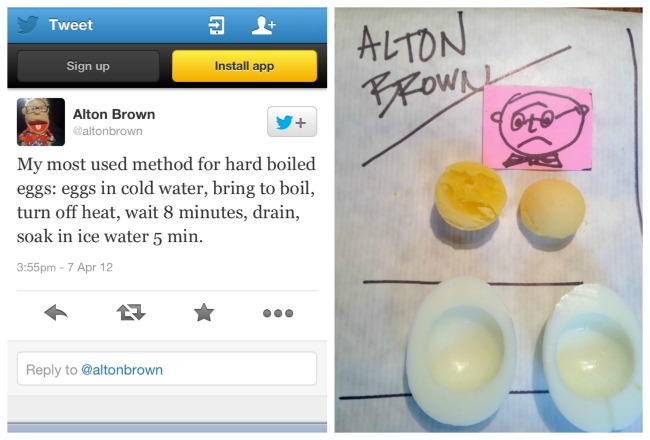
Alton Brown’s method for hard-boiled eggs resulted in a medium/slightly undercooked yolk which tasted good but were not great for making deviled eggs. I could not find a link online but here's what Alton said about hard-boiled eggs on Twitter...

THIS JUST IN: ALTON BROWN'S GONE CRAY-CRAY. His words, not mine. Just hours after I posted this comparison, my former mentor as upped the ante and posted a game-changer... he's now suggesting that baking the eggs in the oven is more reliable and easier than "the harsh enviornment of a pot of boiling water" - SO I had to test that for myself. I found the technique to be more difficult as I had two escapee eggs jump off the towel and onto my floor. However, the result is equally delicious as his boiled version above but again, a little underdone for my preference for hard-boiled eggs for stuffing. Maybe they should cook just a little longer. Here's his new video with the baked version:

The method described by Jamie Deenin his video had the worst result. They tasted fine but were harder to peel and egg white came away with the peel creating big “potholes” in the egg white; pretty unattractive for deviled eggs. So many people looked at the video today that they crashed the site. I'll add a link for you to see it later but basically Jamie said to bring the room temperature eggs to a boil in salted water. Remove from the heat and add a lid and wait 13 minutes. Put in an ice bath. Here's a link to Paula's site with their own test kitchen results. Read more... Paula's method is the same as Jamie's but she lets the eggs sit for 20 minutes which I found way too long and produced rubbery egg whites.

The Julia Child hard-boiled egg method took too long compared to the others and didn’t taste better so I scratched it from the test but I do love this video from her former assistant and one of my favorite chefs, the legendary Jacques Pepin. Notice he pricks the egg with a pin before boiling. I did not try that but will just as soon as I get some more eggs.

I did find something completely new when it comes to peeling a hard-boiled egg: using a teaspoon between the membrane skin and the egg as shown in this Food & Wine video from Justin Chapple from their test kitchen. I tried it and found it harder than just peeling it the classic way. Sorry, Justin. What is it with these quirky guys named Justin?

Tomorrow, I’m going to taste test deviled egg recipes from some of my favorite chefs and report back on the results. Stay tuned!

Tuesday
Dec172013

Holiday Traditions: Southern Pecan Divinity Recipe

Another holiday tradition I grew up with is Pecan Divinity. I can remember standing on a kitchen chair at the counter, two teaspoons in hand, waiting for the moment my mom said "go" and I'd start dropping those little puffs of sugar onto the wax paper in front of me. Divinity is nothing but sugar and egg whites... it is hard to imagine that something so simple can be that delicious but there are a few tricks to getting it just right. If you notice in the photo, the ones on top are smooth and pretty- the ones on the bottom are more craggy. That is because I let the mixture cool too much before dropping the candy. You have to work quickly to get the pretty, silky looking texture.


1. Cook divinity on a day with no rain and no humidity. Let dry completely before storing. At least one hour.

2. Make sure you have an accurate candy thermometer. It is important to get it to exactly 260 degrees (hard ball stage) before you mix the sugar into the egg whites.

3. Work quickly. The candy looks best (somewhat shiny, not craggy) if you drop them while still hot. Once the candy cools off, it doesn't hold the shape as well and looks rough, not smooth on the exterior. It still tastes good, just doesn't look as pretty.


SOUTHERN PECAN DIVINITY RECIPE

*You will need a candy thermometer for this recipe and wax or parchment paper. 

2 1/2 cups granulated sugar

1/4 teaspoon salt

1/2 cup white Karo or light corn syrup

1/2 cup water

2 egg whites

1 teaspoon vanilla

1 cup pecans, toasted and chopped

Prepare two baking sheets with wax or parchment paper.

Add sugar, salt, syrup and water to a large heavy 2 quart saucepan.  Stir. Attach candy thermometer to the side of the pan but don't let it touch the bottom. Over medium high heat, cook the sugar mixture to the hard boil stage or 260 degrees. Don't stir it but you can swirl the pan around until the sugar dissolves, then just leave it alone. Watch the sugar carefully. It will take about 15 minutes to get to 260 degrees. While you are waiting, use a mixer to beat the egg whites to stiff peaks, beating constantly on high speed, about 4-5 minutes.

When the mixture reaches 260 degrees, remove it from the heat. With the mixer on the lowest setting, very slowly stream the hot sugar mixture into the egg whites. Then turn up the speed to high and beat constantly until the mixture holds its shape, about 5-6 minutes. Quickly fold in the pecans. Work rapidly and drop the candy by teaspoon onto the prepared baking sheet.

Let cool and dry at least one hour before storing the candy in an airtight container.

FOLLOW ME ON FACEBOOK, TWITTER AND PINTEREST FOR MORE PARTY IDEAS, RECIPES AND FUN!


Wednesday
Dec112013

Holiday Traditions: Mom's (Addictive) Fruit Cake Cookie Recipe

One of my favorite holiday traditions with my mom was starting our holiday baking the day after Thanksgiving. We always made spiced fruit cake cookies but we'd have to buy the ingredients over a few weeks so we could afford them. I remember the anticipation of watching the shelf fill up with the candied fruit: pineapple, cherries (yes, even the green ones) and how excited I was when we finally got the last ingredient. I still love those cookies... and they hold so many memories for me. 

I know. You hate fruitcake. I'm pretty sure I don't like most of them but I promise you these gorgeous little fruitcake gems are so addictive and delicious, you will not want to wait a whole year to make them again. These are the same mugs we used for Christmas Eve cocoa way back then!

MOM'S HOLIDAY FRUITCAKE COOKIES

Makes about 6 dozen depending on how large you make them.

INGREDIENTS

1 pound candied red cherries

1 pound candied pineapple

1 pound candied green cherries

6 cups pecans, roughly chopped

1 pound dates, chopped

2 tablespoons dark rum

3 cups plus 1 cup all purpose flour

1/4 cup Crisco shortening

1 cup granulated sugar

slight pinch kosher salt

3 teaspoons baking soda

3 tablespoons milk

4 eggs (room temperature)

1 tablespoon orange juice

1 teaspoon nutmeg

INSTRUCTIONS

The day before: chop the dates into small pieces and put them in a glass bowl. Add rum. Cover with plastic wrap. Let sit overnight to absorb the rum. You can leave this step out if you want but I find it makes the dates more delicious and the cookies have more flavor.  

Preheat oven to 375. Line your baking sheets with parchment paper. Get out 2-3 cooling racks.

Dice the candied fruit into small pieces and place in a very large bowl; I use the top of my cake carrier. Roughly chop the pecans and add to the fruit. Add the dates. Add one cup of the flour. Toss well to coat all of the pieces and break them up so they are not sticking together.

Next, whisk the baking soda into the milk and let it dissolve.

Mix the Crisco into the fruit. Add the remaining ingredients: sugar, remaining flour, salt, nutmeg, eggs, orange juice and milk with baking soda into the mixture.  Mix together with your hands but just until you no longer see the flour. Try not to over mix. The batter will be very dense. Use a small ice cream scoop or two teaspoons to drop the cookies onto the prepared pans, about 1 inch apart. 

Bake 10-12 minutes or until golden brown. Cool on the wire cooling racks.

The batter is very dense.

My mom's original recipe for her Christmas CookiesFollow me on Facebook, Twitter, Instagram or Pinterest for more recipes and fun!

Wednesday
Jun272012

Martie on Food Network Star Recipe: Chocolate Roulage from Episode 7

Food Network Star Episode 7: Meet the Press-ure!

The pressure was on when we had to cook a signature dish that would tell the judges who we are in one bite. The additional pressure was the mentors were not going to be on set AND we would be presenting the dish to the press... on camera. My original idea was...  what is a party without cake and ice cream? Since we were going to the Food Network kitchens for the first time, I just knew there would be an ice cream spinner that I could use to make some gorgeous vanilla bean ice cream to go with my individual mini Chocolate Souffle cakes. Alas... there was no ice cream machine and I also found that the cups they secured for me could not go in the oven. PLAN B! With the clock ticking, I had to change my recipe to a recipe using the same ingredients, Chocolate Roulage. On top of that, my oven would NOT heat up and I was down to the wire plating my dish! Ugggh!! Luckily, Justin helped me garnish and it all turned out. Everyone always loves this dessert. Back home in Birmingham, Alabama, Cobb Lane restaurant was known for their Chocolate Roulage... we'd go there for special occasions like bridesmaid luncheons and wedding showers. When they closed, I learned to make Chocolate Roulage and have been making it for Christmas Eve and important family events ever since.

For the show, I make this with a little cayenne and added bourbon to the cream as a nod to my Southern roots. However, I leave these out when making it for the family.  


Chocolate Roulage with Bourbon Cream

Ingredients

Softened unsalted butter, for greasing baking sheet

5 egg yolks

1 cup granulated sugar
3 ounces bittersweet chocolate, chopped

3 ounces semi-sweet chocolate, chopped

1 teaspoon vanilla
1 Tablespoon espresso or strong, black coffee
5 egg whites

1cup cocoa powder
2 cups heavy cream

 3 teaspoons Confectioners’ sugar
1/2 cup bourbon
seeds from 1/2 vanilla bean pod (optional)
1 teaspoon vanilla

Preheat oven to 325-degrees.

Lightly butter a rimmed jelly roll/or baking sheet and line with parchment paper and lightly butter the top of the paper as well, especially the corners.

Fit a stand mixer with whisk attachment, beat the egg yolks and sugar on medium speed until fluffy and the sugar is not gritty, about 10-12 minutes. While the eggs are beating, put chocolate in a bowl and melt over a double boiler. When chocolate is melted, remove from heat, let it cool a bit. Sit the bowl in some cool water for a few minutes, if necessary. Incorporate the egg mixture into chocolate by adding a little at a time to temper the mixture, so you don't cook the eggs. Add vanilla and espresso.

In a clean bowl, and with whisk attachment, beat the egg whites until stiff peaks form. Incorporate 1/4 of egg whites into the chocolate mixture; make sure no white streaks remain. Carefully fold in the remaining whites into the chocolate, taking care not to deflate the whites but making sure not to have any white streaks in the batter.

Spread batter in the prepared pan bake at 325° for 10 minutes. Lower the heat to 300 degrees and cook for another 5 mintues. Remove from the oven. Spread a dampened tea towel or several dampened paper towels over the top of the cake and let it sit for 30 minutes.  

In a clean bowl, with whisk attachment, whip the cream, Confectioners’ sugar, bourbon, vanilla bean and vanilla on medium speed until stiff peaks form. Carefully turn the cake out onto clean parchment paper making sure to have 4-5 inches of excess paper at the end to help you roll the cake. Using a fine sieve or sifter, sprinkle ½ cup cocoa powder over the top of the cake. Spread the whipped cream mixture over the top, leaving ¼ inch on each side. Using the edge of the parchment paper, carefully roll the cake creating a jellyroll effect, tuck and roll as you go, peeling back the paper along the way. Put the rolled cake seam side down and dust the whole cake with the remaining cocoa.

Chill 2 hours before serving. You might even put the cake in the freezer for an hour before serving so that it is easy to slice. To serve, slice cake with a serrated knife and place on chilled plates. Garnish with a light dusting of cocoa powder and fresh berries. 

Yield: 1 roulage, about 6-8 slices depending on the thickness

FOLLOW MARTIE ON FACEBOOK FOR MORE RECIPES, COCKTAILS, PARTY IDEAS & FUN!

Tuesday
Jan172012

Easy and Affordable Recipe: Meringue Party Cookies

I am a big fan of these little meringue cookies. Meringue cookies are light, and airy... they just melt in your mouth. Add food color and they become a whole different thing... they become party decorations, too! You can use them on trays, on cake pedestals, in paper cones or simply fill pretty bowls with them and completely change the look of your dessert table. Since these little gems only have a couple of ingredients, they are not only pretty and delicious, the are also very affordable. You can even make sandwich cookies out of them with Nutella, almond butter, icing, or any other favorite filling. They are simple to make- but they do require a little time so make them the day or night before your party.

PARTY MERINGUE COOKIES

Preheat oven to 200 degrees. Place your rack in the center of the oven so the air can circulate easily around the pan. Best to bake one pan at a time. Line a baking sheet with parchment paper. "Glue" the parchment to the pan to prevent slipping by using a bit of butter on each corner of the pan.

Makes about 20 cookies, depending on the size

Use a pastry bag, a large plastic zip top bag, or even two large spoons to form the cookies.

6 egg whites

1 1/2 cups granulated sugar (use superfine sugar if you have it- it dissolves faster)

1/2 teaspoon cream of tartar

1/2 teaspoon pure vanilla extract (or sub your favorite flavor. I like almond equally as well for the white cookies)

OPTIONAL: a very tiny drop of food coloring to make pastel colored cookies

Fit your mixer with the wire whisk attachment. Put the egg whites into the bowl of the mixer and beat on low-medium speed until they are frothy. Add the cream of tartar and beat until soft peaks form. Turn up the speed on the mixer to medium-high and begin to add the sugar a little at a time, giving each addition a minute to fully incorporate before adding the next bit. Continue to beat until the sugar dissolves and the mixture holds very stiff peaks. You can rub a bit between your fingers to check to see if it is gritty-- if it is, it needs more time. Keep beating the egg whites until you can no longer feel the sugar. Beat in the vanilla.

Use a spatula to transfer the meringue to a plastic bag. Easily work the meringue into the corner of the plastic bag and snip the corner of the bag. Pipe 2- 2 1/2" rounds, leaving a little room between each one. If you mess up on the piping, just scrape it off and put it back in the bag and try again. (It usually takes me a couple of tries before I get it going the way I want them to look.)  

 Bake for 1 1/2-2 hours. Make sure to turn the pan halfway through so that the cookies bake evenly. They are done when they are pale and crisp. Turn off the oven at this point and leave the cookies in the oven overnight to dry out completely.

These can be stored in airtight plastic containers at room temperature for up to a week.

FOLLOW MARTIE ON FACEBOOK FOR MORE RECIPES, COCKTAILS, PARTY IDEAS & FUN!