Search

Friday
Oct192012

Weekend Cocktail: The Honey B

We had quite the party last weekend on Dauphin Island, Alabama. I plan to do a full post about it but one of the big hits of the night (there were many) was my signature cocktail and the bourbon tasting sponsored by Four Roses Bourbon. I have been using Four Roses yellow label for quite a few years for my bourbon cocktails. It's ultra smooth and mixes perfectly with fruit flavors and citrus.

This cocktail is perfect for almost any occasion. It's simple enough for an impromptu get-together and elegant enough for a wedding. The secret of this cocktail is the beautiful Alabama honey. If you can't get exquisite local honey like this, any honey will work but may not yield the glorious rich taste or color.

THE HONEY B

Makes 2-3 cocktails

4 ounces Four Roses Yellow Label Bourbon, room temperature

4 T local honey

1/2 cup lemon juice

1 cup unsweetened tea

Dash of Orange Bitters (find at most good grocery stores in the "adult beverage" mix aisle but regular is ok too)

In a cocktail shaker or pitcher, add the bourbon and the honey, one tablespoon at a time. Stir or shake well to dissolve the honey before you add the next tablespoon so it all dissolves. If you do this with chilled liquid, the honey will seize up and make it difficult to dissolve.

You may also heat the lemon juice slightly and dissolve the honey in that before mixing everything together.

Add the remaining ingredients. Serve over ice. You may also add a bit more of the tea and serve this as a warm cocktail.


 A great time was had by all. Thank you Four Roses!

Sunday
Jul012012

Simple Summer Fun: Beat the Heat with Homemade Popsicles! 

In the past, popsicles were just for the kids. Not anymore! Popsicles today are as diverse as the many flavors you can use to create them. I got on a popsicle kick last summer and started making my own. Now, a year later, I am completely obsessed with these frosty concoctions and have lots of new ideas for fruity and creamy creations. I prefer to keep it simple and use plastic cups as molds because they are flexible and release the pops easily but there are many different inexpensive plastic popsicle molds available that you can buy almost anywhere.

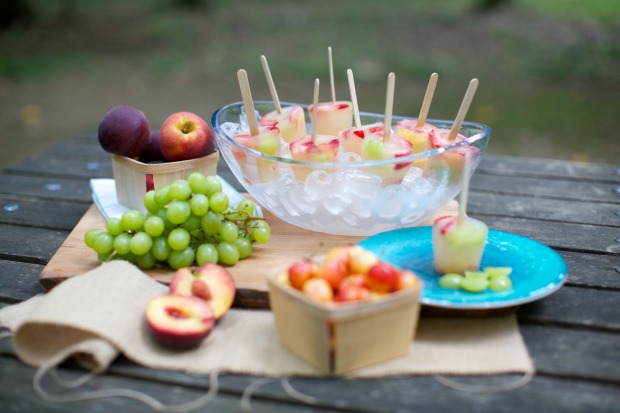
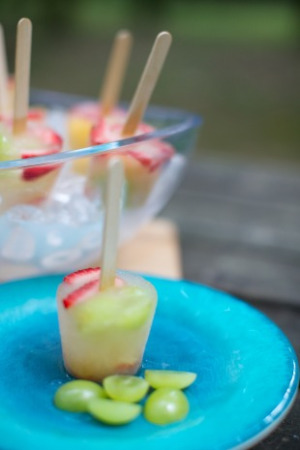
Use plastic cups to make perfect frozen pops for summer parties like these yummy Sangria Pops with summer fruits

TRICKS FOR FAST, EASY POPSICLES

1. Use chilled ingredients when you can so your pops freeze faster. Allow pops to set up and freeze a bit before inserting the sticks so they will stay centered.

2. If you are layering flavors or colors, you have to allow the first layer to freeze completely.

3. If you are using fruit or other add-ins in a juice based liquid, it will usually float to the top of the cup- which will be the bottom of the pop. If you want it to be distributed throughout the whole popsicle, you have to add it as they set up.  

4. When using fruit or mix-ins with a cream based pop, it will usually stay suspended throughout the pop.

5. If you are using crumbs or sprinkles, add a bit of liquid to them and allow them to freeze completely before adding the other layers.

6. Anything with a high fat content like heavy cream or Half and Half tastes great- but won't set up as hard as whole milk will so use it in moderation or you will have a difficult time getting the pops to release from the mold.

7. Fruit juice and tea freeze very hard so add some water and a bit of sugar before freezing.

8. Fresh fruits freeze well and taste great. Puree the fruit and add a little agave nectar, simple syrup, or honey to sweeten. Artificial sweeteners don't freeze well for some reason. I like to use infused simple syrup- like mint or vanilla to make the fruits really exotic and full of flavor.

9. If you want to add soda to your pops, it's better to let them go flat first or you'll have lots of bubbles in the texture and they'll probably overflow in the freezing process.

10. Leave a little room at the top of the mold because the liquids will expand when they begin to freeze and spill over unless you allow some room.

11. Alcohol does not completely freeze. If you want to make adult versions of your pops, you'll need to dilute the liquor with some fruit juice or water. I recommend making the pops with very light liquor then serving the pops in a pretty glass with a shot of the chilled libation.

12. To remove pops from plastic molds or cups, very quickly dip them in warm water or rub between your palms for a couple of seconds and they should release.

MOLDS FOR FROZEN POPS

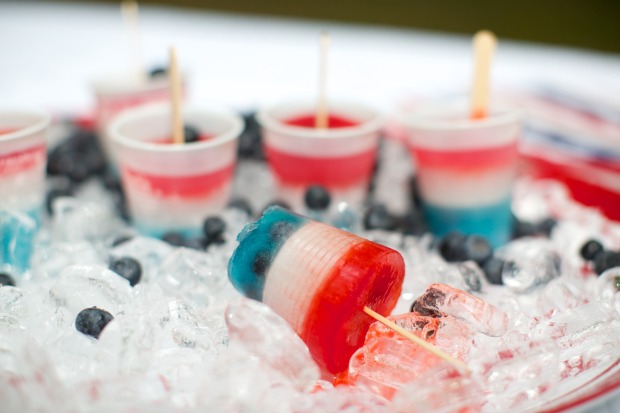
I typically prefer to use small plastic cups for my frozen treats for a variety of reasons: they have a wide mouth so they are easy to pour and layer and they are flexible so the pops release easily. Small plastic cups are also the perfect serving size , they store easily, and you can wash them to use them over and over again. They also help keep melting pops from making a huge mess and still look very pretty in a bowl full of ice for serving, especially the clear plastic cups like these I made with blueberries and strawberries for 4th of July.


There are also lots of innovative popsicle molds on the market like these fun tray and straw molds which allow you to sip the popsicle as it melts.

When I was a kid, we'd make our own popsicles using Kool-Aid and a plastic ice tray. While we didn't have popsicle sticks so my mom would give us one or two in a Dixie cup and send us outside to eat them.  My current favorite summer serving solution is a spin on this old school classic. I serve popsicles in plastic glasses for a party. For the kids, this helps keep mess to a minimum and for the adults, you can ramp up the festivities by pouring over your favorite chilled libation. Get the how-to for Popsicles & Prosecco...

      Serve popsicles with chilled Prosecco or sparkling soda 

COCKTAIL POPSICLES

Along the same lines, another big trend is cocktail popsicles. Freeze your favorite cocktail into a frosty bite. You can serve these in cups, cocktail glasses, or on a big tray of ice. Remember that alcohol does not completely freeze so you do need some other ingredients and limit the amount of alcohol in the pop. I often put a bottle of my favorite libation (vodka, bourbon, rum, liqueur, etc) into the freezer for a few hours and then simply pour it over the pop served in a pretty glass. Everyone loves this and it is so refreshing as a dessert after a heavy meal or to start the party rocking on a hot night. Get the recipe for my Sangria pops...

Fresh fruit Sangria pops are a perfect summer party starterFrozen watermelon margaritas Get more popsicle recipes...

Have a frosty cool summer! Follow me on Facebook for more recipes, cocktails, party ideas and fun! ALL PHOTOS BY ARDEN PHOTOGRAPHY

Friday
Jun292012

Cocktail Popsicles: Make Sangria Pops!

Last summer, I went crazy over popsicles, using homemade and store-bought popsicles in a variety of different ways to create cocktail popsicles. One of my favorite things to do is to put tequila, vodka, bourbon, or rum in the freezer to get it really cold. To serve, pour over a fruit flavored popsicle in a glass. The popsicle melts and creates a nice cocktail. I've done the same thing with cold Prosecco or Champagne. My Popsicles and Prosecco is always a huge hit. 

Here is the latest version of cocktail popsicles: Sangria Pops. I always have loved serving big pitchers of fresh fruit Sangria for a party and I like to use the fruit that is fresh and locally available. But here is a new way to greet your party guests that pretty, frosty cold, and delicious... perfect for a hot summer night. They are even pretty enough for a special occasion. Make up tons of these fresh fruit Sangria Pops in advance and serve them on a platter filled with ice or in a chilled wine glass. Either way, guests will love them!

Fresh Fruit Sangria Pops Photo by Arden Photography

SANGRIA POPSICLES

Makes 12-24 popsicles depending on the size of the cup or mold

1 bottle white wine (you can use what you like- even Rose is good)

3 cups white grape juice

2 cups fresh fruit of any combination (I used strawberries, cherries, and green grapes)

1 teaspoon sugar

2 teaspoons orange juice

Small plastic cups or popsicle molds

Popsicle sticks

Slice the fruit into small chunks or slices. Put in the bottom of a pitcher and add the sugar and orange juice. Stir well so that the sugar dissolves. Pour over the wine and the grape juice. Stir well. Pour into small plastic cups arranged on a sheet pan or cake pan that will fit into your freezer. Let them become semi-frozen for an hour or so and then add the popsicle sticks. Let them freeze for at least 4 hours- more if you have a large mold or larger cup.

Serve on ice or in chilled wine glasses... you can even pour chilled white wine over them... easy and delcious!

FOLLOW MARTIE ON FACEBOOK FOR MORE RECIPES, COCKTAILS, PARTY IDEAS & FUN!

Wednesday
Jun272012

Martie on Food Network Star Recipe: Chocolate Roulage from Episode 7

Food Network Star Episode 7: Meet the Press-ure!

The pressure was on when we had to cook a signature dish that would tell the judges who we are in one bite. The additional pressure was the mentors were not going to be on set AND we would be presenting the dish to the press... on camera. My original idea was...  what is a party without cake and ice cream? Since we were going to the Food Network kitchens for the first time, I just knew there would be an ice cream spinner that I could use to make some gorgeous vanilla bean ice cream to go with my individual mini Chocolate Souffle cakes. Alas... there was no ice cream machine and I also found that the cups they secured for me could not go in the oven. PLAN B! With the clock ticking, I had to change my recipe to a recipe using the same ingredients, Chocolate Roulage. On top of that, my oven would NOT heat up and I was down to the wire plating my dish! Ugggh!! Luckily, Justin helped me garnish and it all turned out. Everyone always loves this dessert. Back home in Birmingham, Alabama, Cobb Lane restaurant was known for their Chocolate Roulage... we'd go there for special occasions like bridesmaid luncheons and wedding showers. When they closed, I learned to make Chocolate Roulage and have been making it for Christmas Eve and important family events ever since.

For the show, I make this with a little cayenne and added bourbon to the cream as a nod to my Southern roots. However, I leave these out when making it for the family.  


Chocolate Roulage with Bourbon Cream

Ingredients

Softened unsalted butter, for greasing baking sheet

5 egg yolks

1 cup granulated sugar
3 ounces bittersweet chocolate, chopped

3 ounces semi-sweet chocolate, chopped

1 teaspoon vanilla
1 Tablespoon espresso or strong, black coffee
5 egg whites

1cup cocoa powder
2 cups heavy cream

 3 teaspoons Confectioners’ sugar
1/2 cup bourbon
seeds from 1/2 vanilla bean pod (optional)
1 teaspoon vanilla

Preheat oven to 325-degrees.

Lightly butter a rimmed jelly roll/or baking sheet and line with parchment paper and lightly butter the top of the paper as well, especially the corners.

Fit a stand mixer with whisk attachment, beat the egg yolks and sugar on medium speed until fluffy and the sugar is not gritty, about 10-12 minutes. While the eggs are beating, put chocolate in a bowl and melt over a double boiler. When chocolate is melted, remove from heat, let it cool a bit. Sit the bowl in some cool water for a few minutes, if necessary. Incorporate the egg mixture into chocolate by adding a little at a time to temper the mixture, so you don't cook the eggs. Add vanilla and espresso.

In a clean bowl, and with whisk attachment, beat the egg whites until stiff peaks form. Incorporate 1/4 of egg whites into the chocolate mixture; make sure no white streaks remain. Carefully fold in the remaining whites into the chocolate, taking care not to deflate the whites but making sure not to have any white streaks in the batter.

Spread batter in the prepared pan bake at 325° for 10 minutes. Lower the heat to 300 degrees and cook for another 5 mintues. Remove from the oven. Spread a dampened tea towel or several dampened paper towels over the top of the cake and let it sit for 30 minutes.  

In a clean bowl, with whisk attachment, whip the cream, Confectioners’ sugar, bourbon, vanilla bean and vanilla on medium speed until stiff peaks form. Carefully turn the cake out onto clean parchment paper making sure to have 4-5 inches of excess paper at the end to help you roll the cake. Using a fine sieve or sifter, sprinkle ½ cup cocoa powder over the top of the cake. Spread the whipped cream mixture over the top, leaving ¼ inch on each side. Using the edge of the parchment paper, carefully roll the cake creating a jellyroll effect, tuck and roll as you go, peeling back the paper along the way. Put the rolled cake seam side down and dust the whole cake with the remaining cocoa.

Chill 2 hours before serving. You might even put the cake in the freezer for an hour before serving so that it is easy to slice. To serve, slice cake with a serrated knife and place on chilled plates. Garnish with a light dusting of cocoa powder and fresh berries. 

Yield: 1 roulage, about 6-8 slices depending on the thickness

FOLLOW MARTIE ON FACEBOOK FOR MORE RECIPES, COCKTAILS, PARTY IDEAS & FUN!

Friday
Jun222012

Simple Summer Suppers: Lemon Herb Shrimp over Pasta

When I get off work on a Friday afternoon in the summer, I cannot wait to get the weekend started. I don't feel like making complicated food... I want it to be fast, delicious, and I don't want to heat up the house by using the oven. This dish is so easy to whip up for a couple or a couple dozen guests. The key is to use fresh herbs and the best shrimp you can find. For me, that is Alabama Gulf Coast shrimp... I'm lucky to have easy access to it. Frozen shrimp will work if that is what you can get but oh my, what a difference you will taste if you use fresh shrimp. Make this for supper and serve it with some toasty bread and a nice chilled glass of white wine and you've got a good start on a relaxing weekend.


LEMON HERB SHRIMP OVER PASTA

1 tablespoon olive oil

2 cloves garlic, smashed

2 tomatoes

1 teaspoon salt

1/2 teaspoon pepper

pinch red pepper flakes

1/2 teaspoon dried oregano

2 bay leaves

1 teaspoon finely chopped fresh thyme

1 pound shrimp, peeled and deveined, tails left on

1 cup seafood stock (I make my own using the shrimp shells but you can use the boxed kind)

1/2 cup white wine (I used a Sauvignon Blanc)

1 lemon, sliced

 1 tablespoon butter

1 tablespoon finely chopped parsley

Hot cooked angel hair or pasta of your choice... I use angel hair because it only takes a few minutes to cook.

In a large skillet or saucepan over medium high heat, add the olive oil. Once it is hot, add the smashed cloves of garlic and saute. Tilt the pan to make sure the oil covers the garlic and cook it for 2 minutes to infuse the oil with the garlic flavor. Cut the tops off of the tomatoes and crush them with your hand into the pan, squeezing all the juice from them. Add salt, pepper, red pepper flakes, bay leaves and oregano. Break the tomatoes into small pieces and cook for one minute. Add the wine and the stock. Bring to a boil and cook for 2 minutes. Check the seasoning. You may need to add a bit more salt and pepper. Add the shrimp and allow them to cook for 2 minutes. Squeeze the lemon halves over the shrimp and drop both halves into the pan.  Flip the shrimp and cook another 2-3 minutes on the other side or just until the shrimp turn pink. Remove from heat. Add the butter and the parsley. Cover and let stand for 2 minutes. Serve over cooked hot pasta.

FOLLOW MARTIE ON FACEBOOK FOR MORE RECIPES, COCKTAILS, PARTY IDEAS & FUN!